HotKey Plugin
Hotkey plugin can be use to create triggers that run AutoHotkey script. Figure 1 show an example of a hotkey for ctrl+win+a that launches the Programs and Features ( add / remove) Control Panel window.
Click on the various control of Figure 1 to be taken to the description of the control.
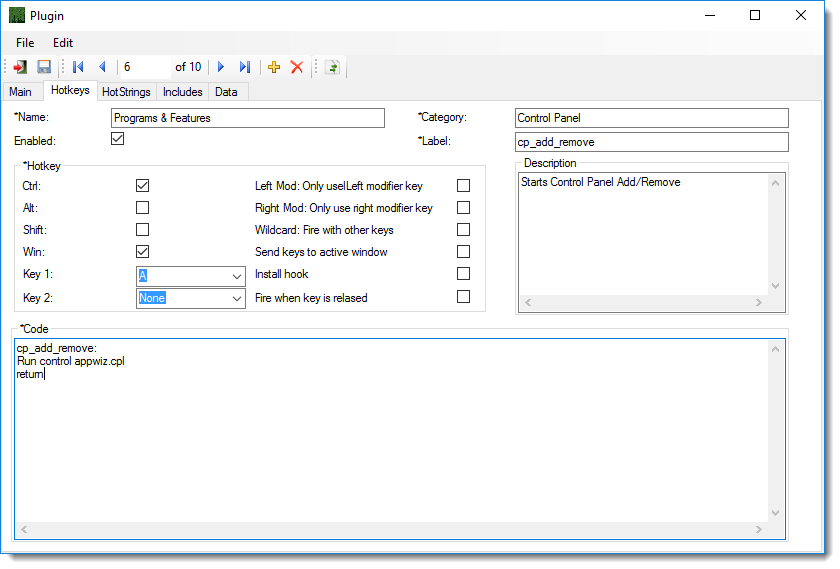
Name: is Required and is the name of the Hot Key as displayed in the Main List.
Category: is optional as is used in filtering the Main List.
Enabled: If Check then the Hot Key will be Enable; Otherwise, the Hot Key will be disabled.
Description: Is optional and is used to help describe what the Hot Key does.
Label: Is required and this is the label that matches the Code Entry Label Point. The Label is not to end with a Colon (:) but in the code window the label must end with a colon as required by AutoHotkey Labels.
Code: This is the Code that does the work. When the Hotkey is fired this is the Code that runs to take action.
Hotkey: Hotkeys are made up from a combination of the following.
Ctrl - Adds the Control Modifier key to the hotkey
Alt - Adds the Alt Modifier key to the hotkey
Shift - Adds the Shift Modifier key to the hotkey
Win - Adds the Windows Modifier key to the hotkey
Left Mod - Only fires hotkey when left modifier key(s) are pressed. Will not respond to right modifier keys
Right Mod - Only fires hotkey when right modifier key(s) are pressed. Will not respond to right modifier keys
Wildcard - Fire the hotkey even if extra modifiers are being held down.
Send Keys to the active window. When the hotkey fires, its key's native function will not be blocked (hidden from the system). See the ~ symbol in AutoHotkey documentation for more information
Install Hook - install keyboard hook and prevents key from calling itself. See the $ symbol in AutoHotkey documentation for more information.
Fire When key released will not fire the hotkey until the key is released.
Key 1 - The main key for the hotkey. Key 1 is always required for a valid hotkey.
Key 2 - The optional second key for the hotkey. For instance you may have a hotkey such as a+b that would not trigger until both a and b keys are pressed. Or you may use a key combination with modifier such as ctrl+win+a+b which would be triggered when ctrl+win+a are pressed and released followed by b.
Modifier keys are keys such as ctrl (control), alt, shift and win (windows) keys.
Remarks
Key 2 is not required to create a hotkey.
If Key 1 and Key 2 are used with any modifier keys then the hotkey will work differently then if key 1 and key 2 are used with no modifiers.
Without modifiers Key 1 and Key 2 must be pressed together to be triggered.
With modifiers you must press and release the modifiers keys with key 1 then press key 2 alone to activate the trigger.
The Code may contain other labels and Methods. Basically any code that is acceptable in AutoHotkey including Classes.
AutoHotkey Snippit is built upon Mini-Framework, this means your code can call any class from the Mini-Framework as well.
The Form is self Validating. If all the proper fields are not filled out then the form will not allow save. The Code in the edit box will not be validated other then the form validates that it exist. Writing bad code here may cause problems in AutoHotkey Snippit.
Be Careful with the code your write or accept.